

How To Update Asrock Taichi Bios
BIOS Update Procedure(Instant Wink)
At that place are 2 methods for updating the BIOS using Instant Flash.
Method 1:
- Save the BIOS files on a device such every bit USB disk (FAT32 format), difficult disk (FAT32 format) and floppy drive.
- Press [F2] during POST to get into BIOS setup menu.
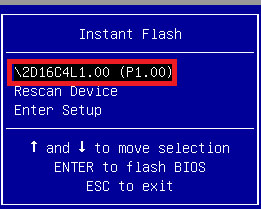
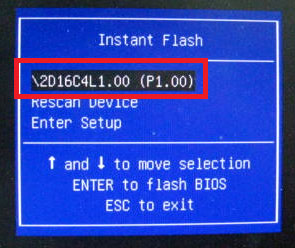
- Select the Instant flash under [Avant-garde] menu to execute information technology.

- ASRock Instant Flash will automatically find all devices and only list those BIOS versions which are suitable for your motherboard, and select the suitable BIOS version and flash.
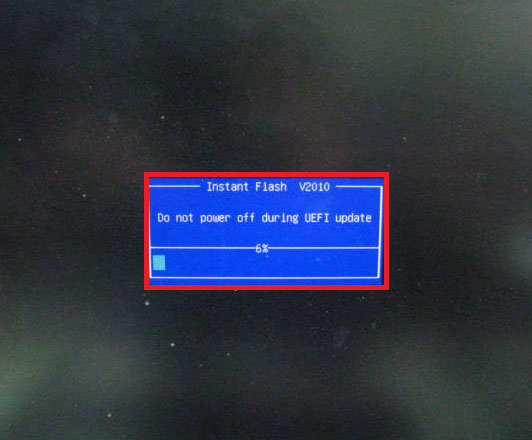
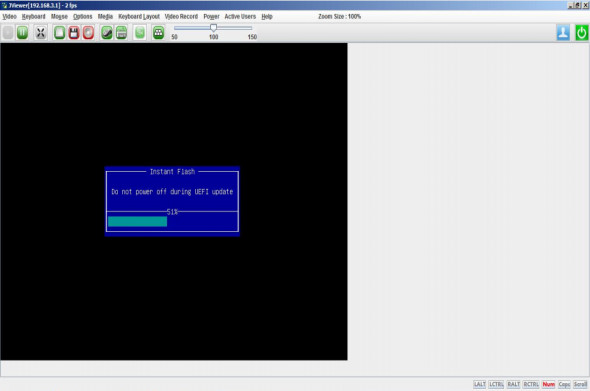
- Please DO NOT power off during BIOS update.
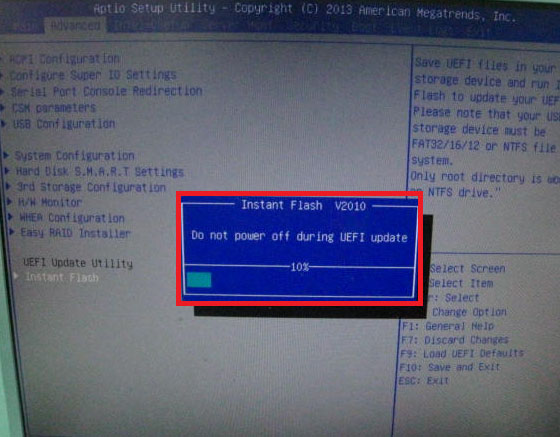
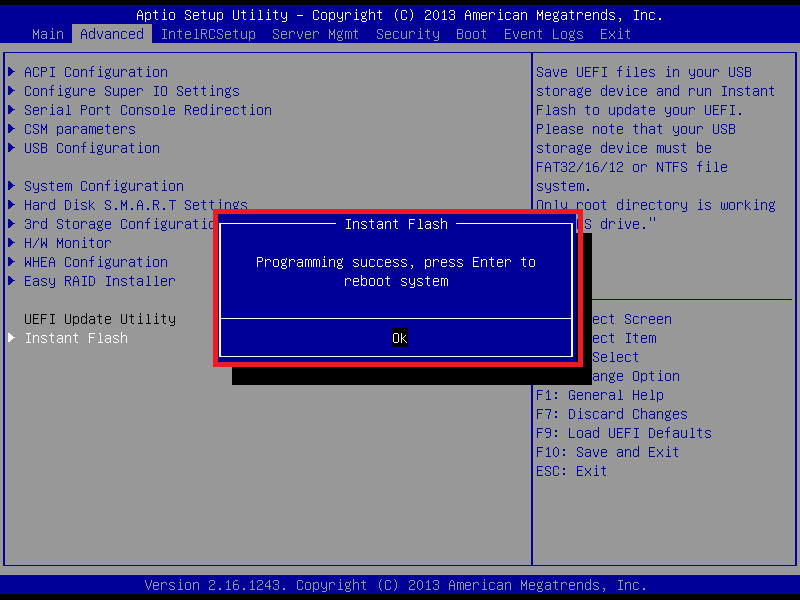
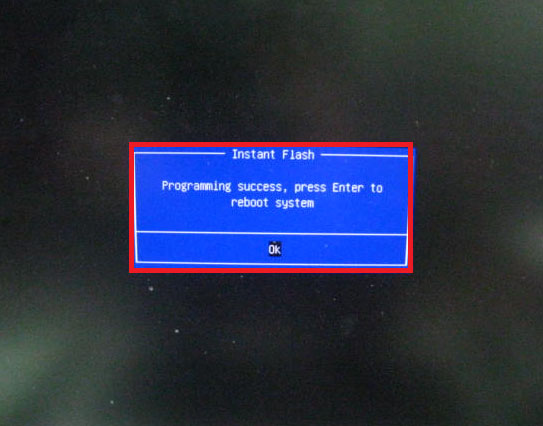
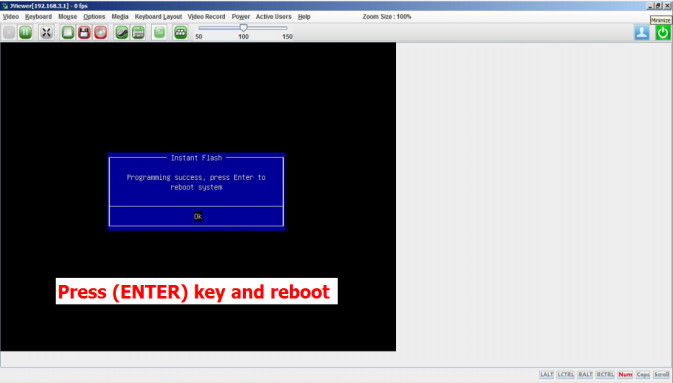
- After update success, it will pop upward below massage. Please press Enter to reboot system.
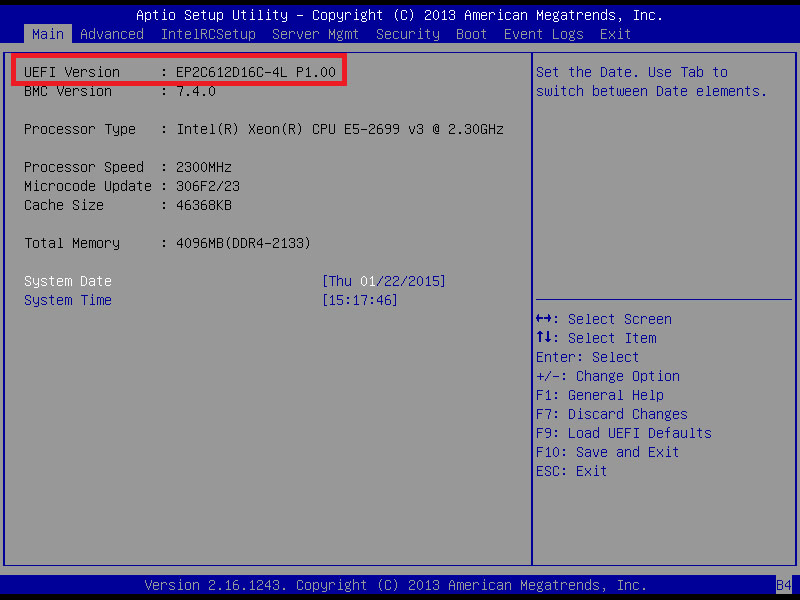
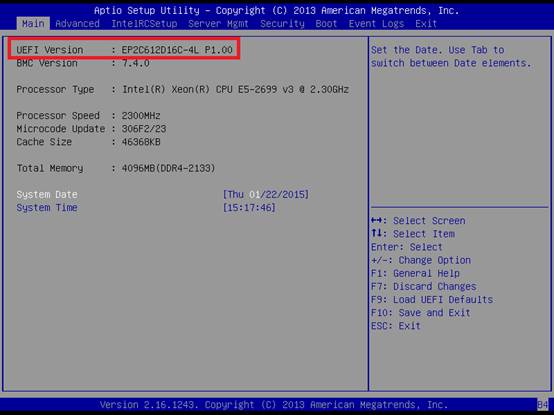
- After system restart, printing [F2] or [Del] to enter the BIOS setup utility during boot upward to check BIOS version.
- In Leave carte, delight select "Load Default Settings" and press [Enter] to keep.
- Select "Leave Saving Changes" and press [Enter] to exit the BIOS setup utility.
Method 2:
- Save the BIOS files on a device such every bit USB disk (FAT32 format), hard disk (FAT32 format) and floppy drive.
- Press [F6] when you see this (or like) page.

- Select the suitable BIOS version and flash.
- Delight DO NOT power off during BIOS update.
- Later on update success, it will pop upwards beneath massage. Please press Enter to reboot system.
- Later on arrangement restart, press [F2] or [Del] to enter the BIOS setup utility during kicking up to check BIOS version.
- In Exit card, please select "Load Default Settings" and printing [Enter] to continue.
- Select "Exit Saving Changes" and press [Enter] to go out the BIOS setup utility.
- Now, system is booting up with new BIOS.
If yous encounter problems while updating the new BIOS, DO Not turn off your system since this corrupt BIOS might cause your system failed to boot up. Just echo the procedure, and if the problem still persists, update the original BIOS file. If the Flash Memory Writer utility was not able to successfully update a complete BIOS file, your system may not exist able to kick upward. If this happens, your system volition need service.

BIOS Update Procedure(DOS)
BIOSfilename.EXE: The Flash Retentiveness Writer utility is included in the WinZip format of BIOS file. It updates the BIOS past uploading a new BIOS file to the programmable flash ROM fleck on the motherboard.
- Create a bootable organization USB pen drive.
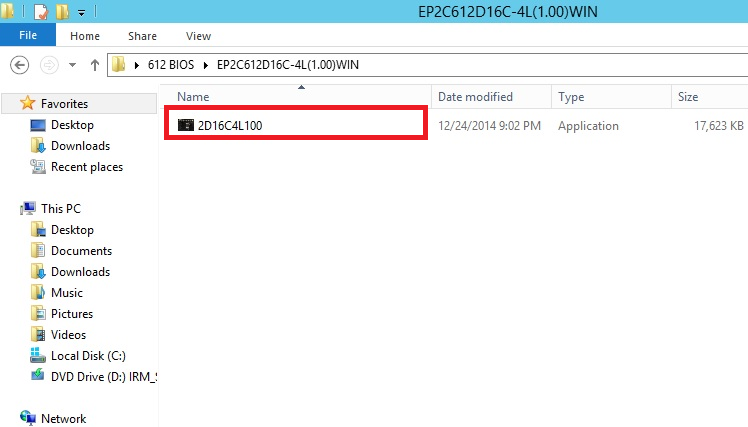
- Download an updated ASRockRack BIOS file (WinZip format with .zip file extension) from the web site, unzip the BIOS file and save all files to the drive you created in step one.
- Boot from the deejay you created in footstep 2.
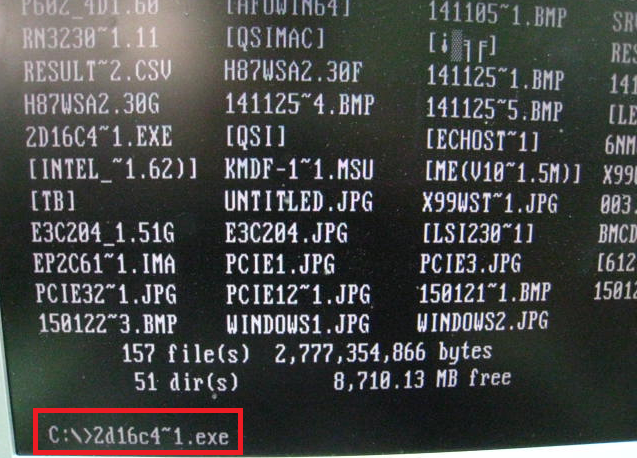
- At the "C:\" prompt, blazon BIOSfile.exe, then printing [Enter]. For example: C:\2D16C4~one.exe
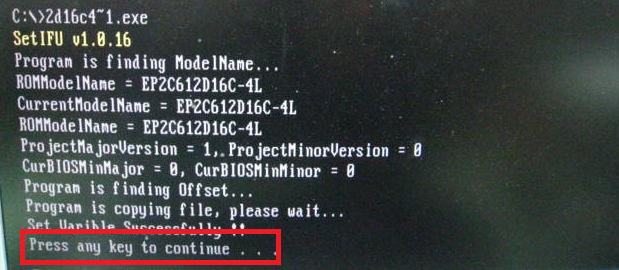
- When meet below massage, delight press any key to continue.
- Organization will auto restart, and update BIOS. Please Exercise NOT ability off during BIOS update.

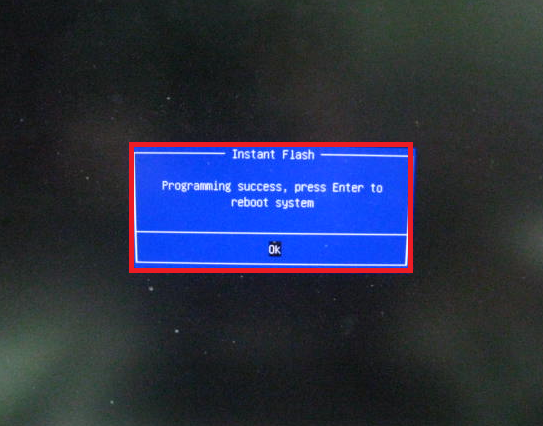
- Later on update success, it will pop up below massage. Delight printing Enter to reboot arrangement.
- After system restart, printing [F2] or [Del] to enter the BIOS setup utility during kick up to check BIOS version.

- In Exit menu, delight select "Load Default Settings" and printing [Enter] to continue.
- Select "Exit Saving Changes" and press ]Enter] to exit the BIOS setup utility.
- Now, system is booting upwards with new BIOS.
If you meet problems while updating the new BIOS, DO Non turn off your organisation since this corrupt BIOS might crusade your system failed to boot up. Just repeat the procedure, and if the problem still persists, update the original BIOS file. If the Flash Memory Writer utility was not able to successfully update a complete BIOS file, your system may not exist able to kicking upwardly. If this happens, your system will need service.
BIOS Update Procedure(Windows)
This utility works in Microsoft® Windows 7 (32 / 64 bit), Windows 8 (32 / 64 chip), Windows eight.one (32 / 64 fleck), Server 2008 R2 SP1 (64 bit), Server 2012 (64 bit),Server 2012 R2 (64 bit).
- Download the BIOS parcel (WinZip format with .zip file extension). And close all programs.
- Unzip and relieve all files to the same directory of whatever storage location accessible by the host organization.
- Click BIOSfilename.exe
- It shows a dialog icon to remind you need to restart the system before updating BIOS. Click "Yes".
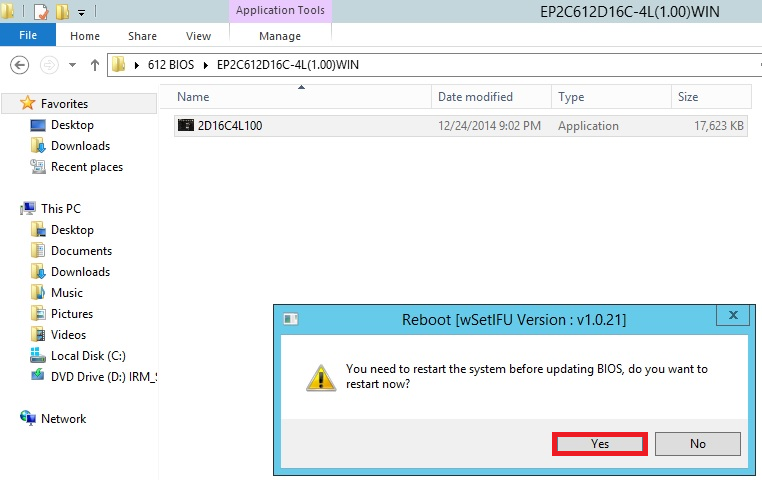
- Organisation volition motorcar restart, and update BIOS. Please Practice Non power off during BIOS update.

- Afterwards update success, it will pop up beneath massage. Please press Enter to reboot system.

- After system restart, press [F2] or [Del] to enter the BIOS setup utility during boot upwardly to check BIOS version.

- In Exit menu, please select "Load Default Settings" and press [Enter] to go on.
- Select "Leave Saving Changes" and press [Enter] to go out the BIOS setup utility.
- At present, system is booting upwardly with new BIOS.
If you come across problems while updating the new BIOS, Exercise Not turn off your system since this decadent BIOS might cause your system failed to boot up. Just repeat the process, and if the trouble however persists, update the original BIOS file. If the Flash Memory Writer utility was not able to successfully update a consummate BIOS file, your system may not be able to kicking up. If this happens, your organization will need service
BIOS Firmware Update past IPMI
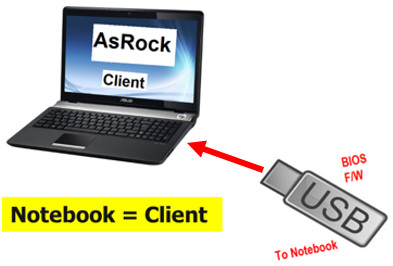
- Make sure yous have continued a LAN cable from the laptop (client) to the dedicated IPMI LAN port on the Server. Gear up an USB device with the BIOS firmware installed.
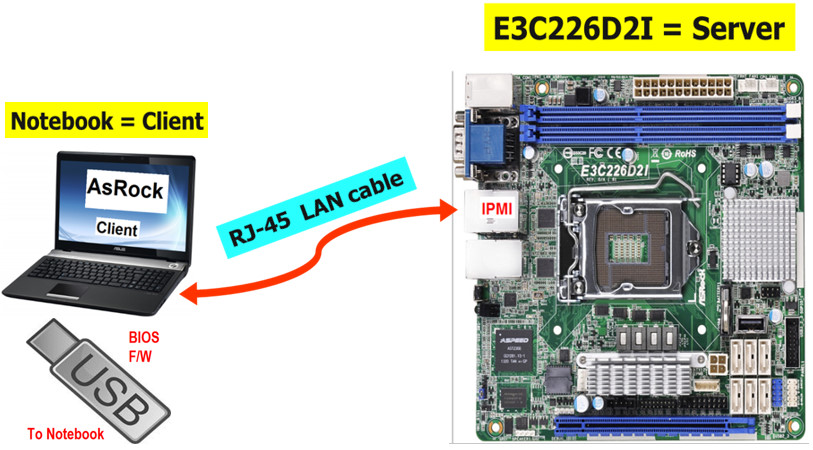
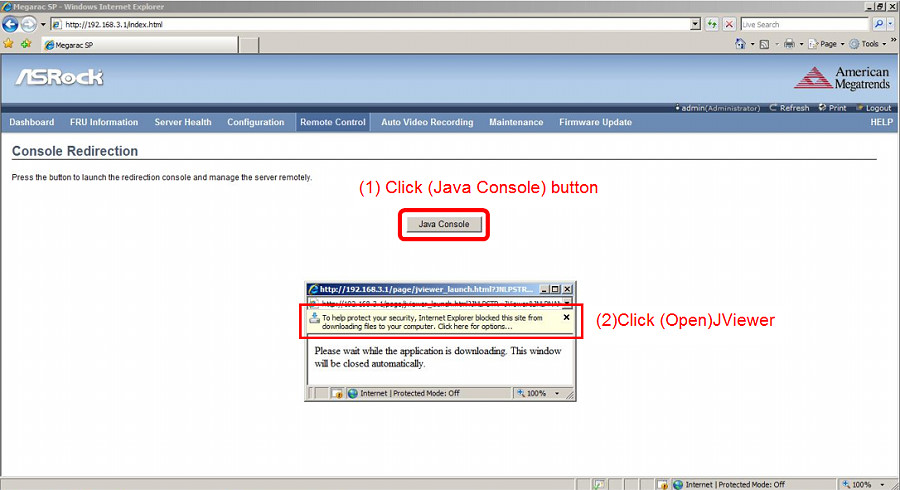
- Enter the direction organization from your laptop (client). Become to Remote Command > Panel Redirection.

- Click Java Console > Open to open the JViewer.
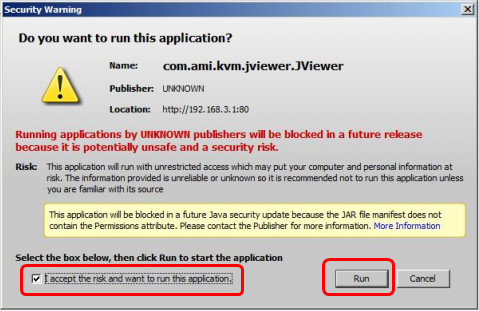
- Select "I accept the adventure and want to run this application." and click Run to launch the JViewer.
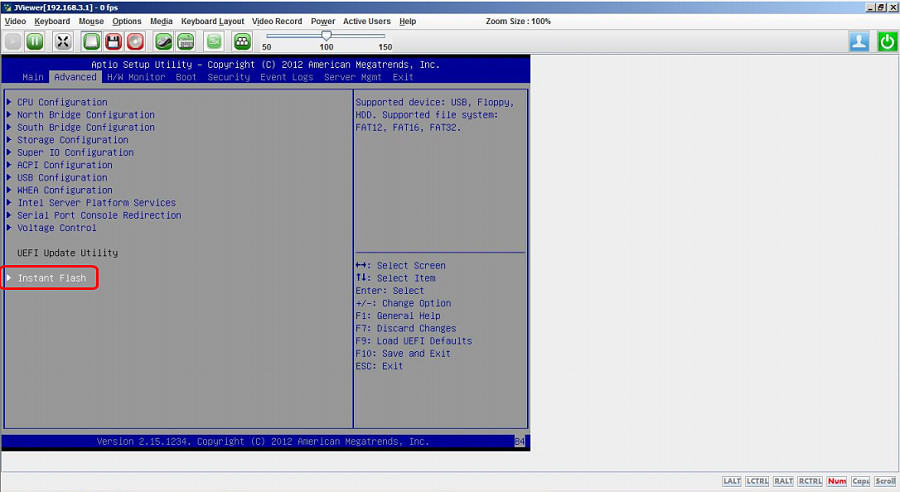
- In the BIOS screen, go to Avant-garde > Instant Flash.
- Insert the USB device with the BIOS firmware installed into your laptop (client).
- Click Hard Disk/USB Redirection.

- Select the inserted USB and click Connect Difficult disk/USB.
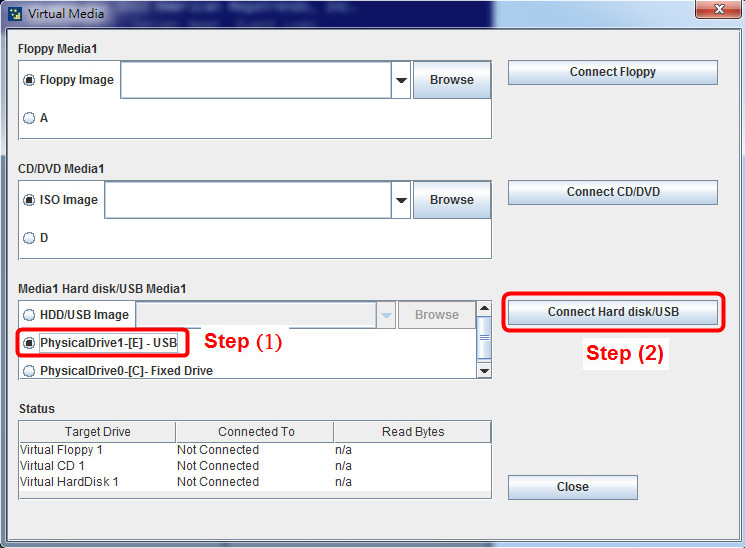
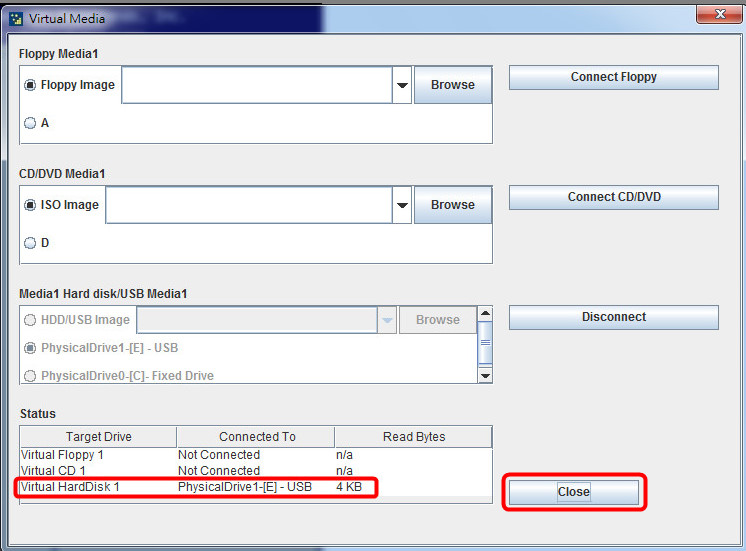
- Confirm the inserted USB device is plant and click Shut to exit.
- In the BIOS, go to Advanced > Instant Flash and printing the [Enter] key on the keyboard to select.
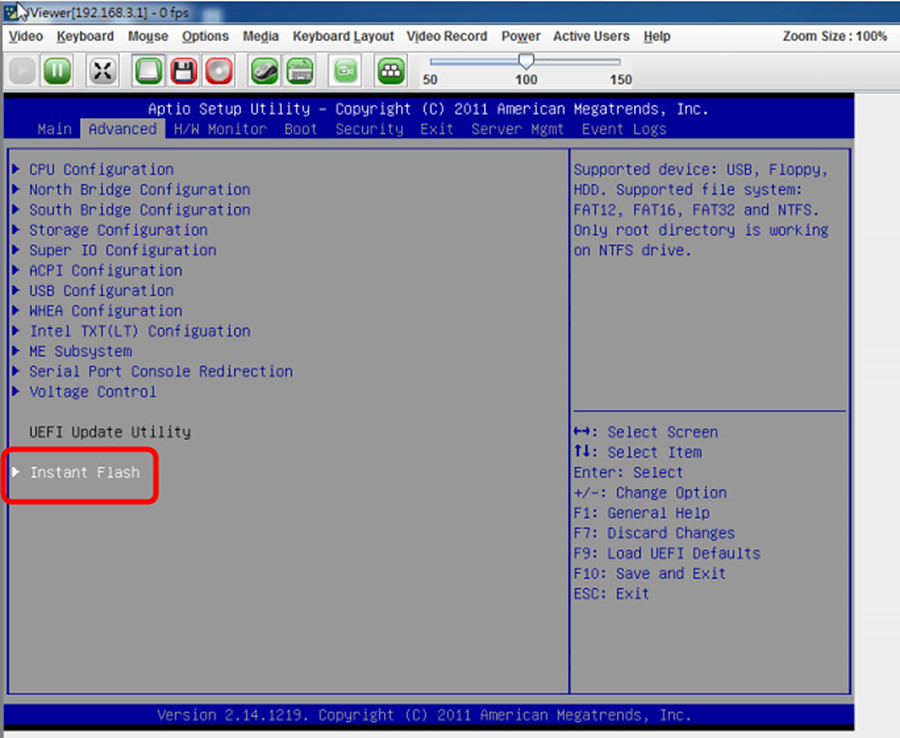
- Cull the desired BIOS firmware and press [Enter].
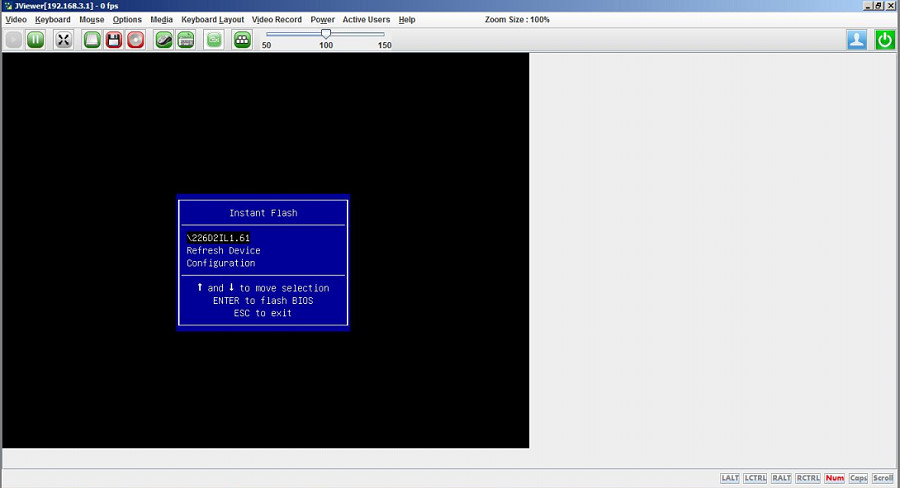
- The BIOS updating begins.
- After upgrade, press [Enter] key to reboot the server and confirm the BIOS and BMC versions.
How to update BIOS through Server Management Utility?
How to update BIOS through Server Management Utility?
(Supports server motherboard congenital with BMC AST2500 controller)
Grooming
i. Download and install the Server Management Utility.
(Download: http://www.asrockrack.com/support/SMU.asp)
Steps
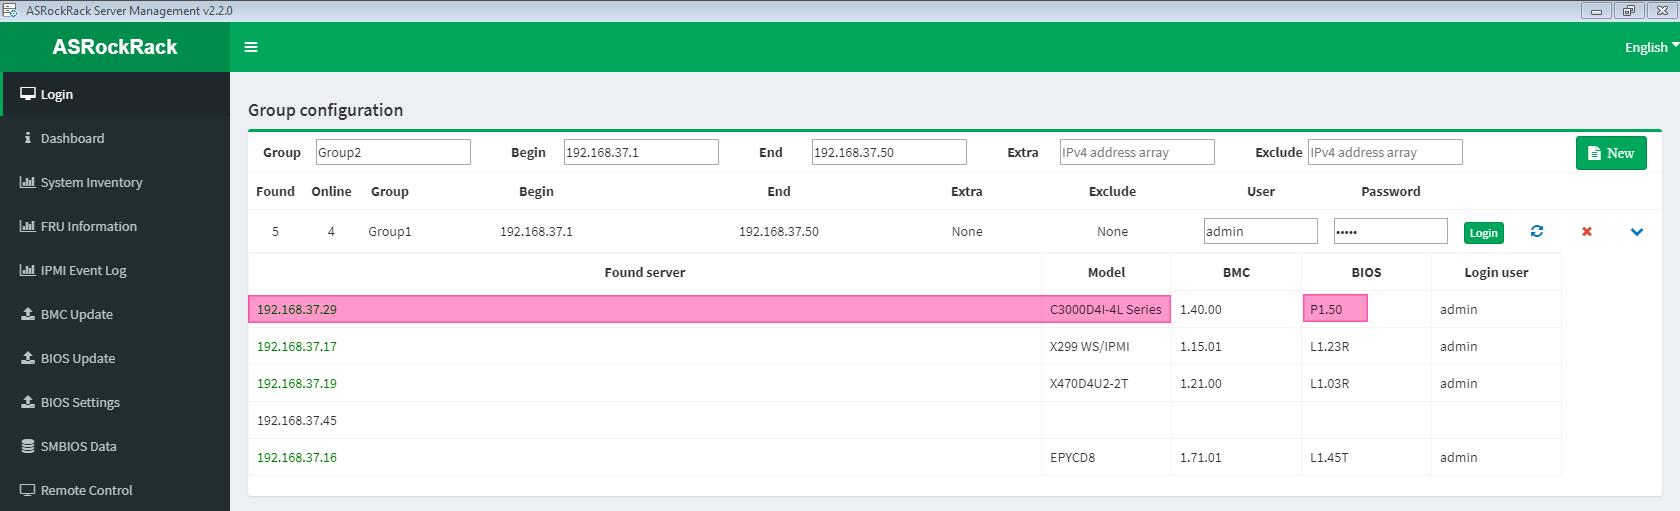
Stride ane: Login
ane~three: Key-in the IP address range to search out the host machine where demand to practice the BIOS update procedure.
iv~v: Fundamental-in BMC login business relationship, then pull-down to bank check those searched machines.
(For instance: Host car IP = 192.168.37.29)
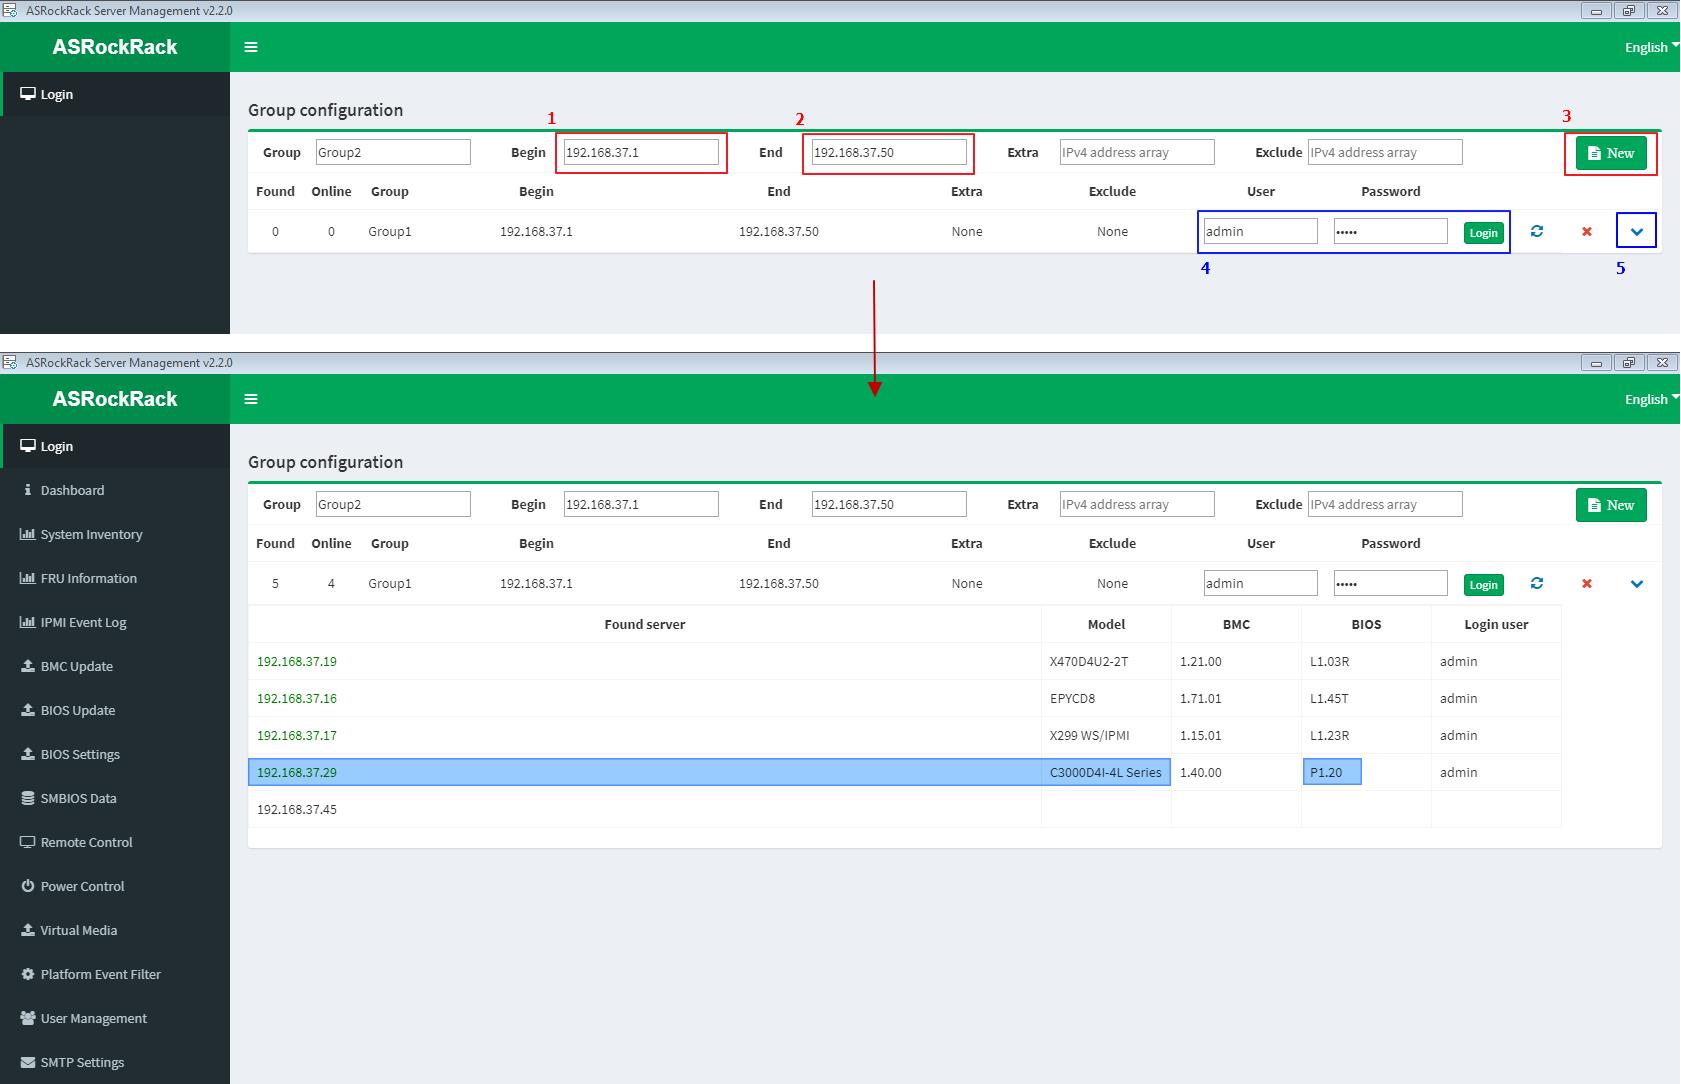
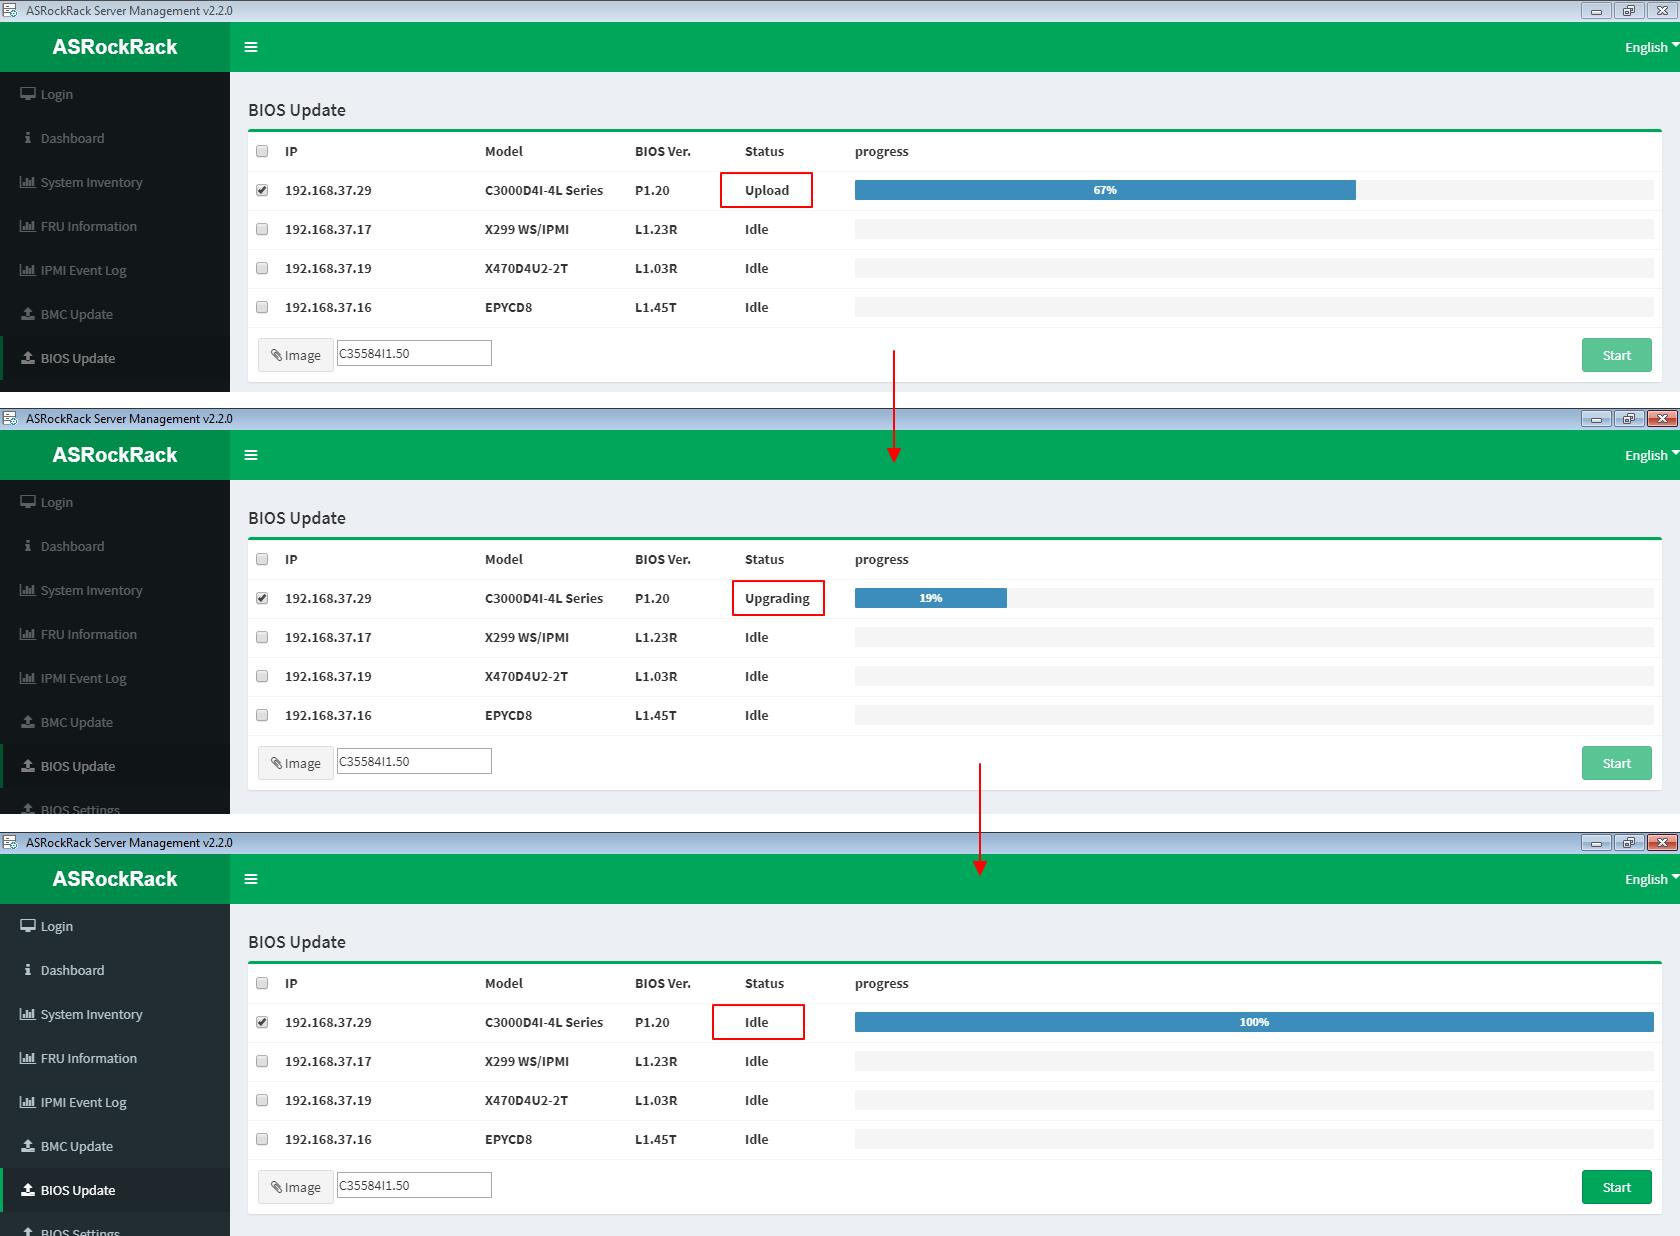
Step 2: BIOS Update
- Tick to select the host auto (ex. 192.168.37.nineteen)
- Import the host machine BIOS image file
- Click "Starting time" button to outset the BIOS update process
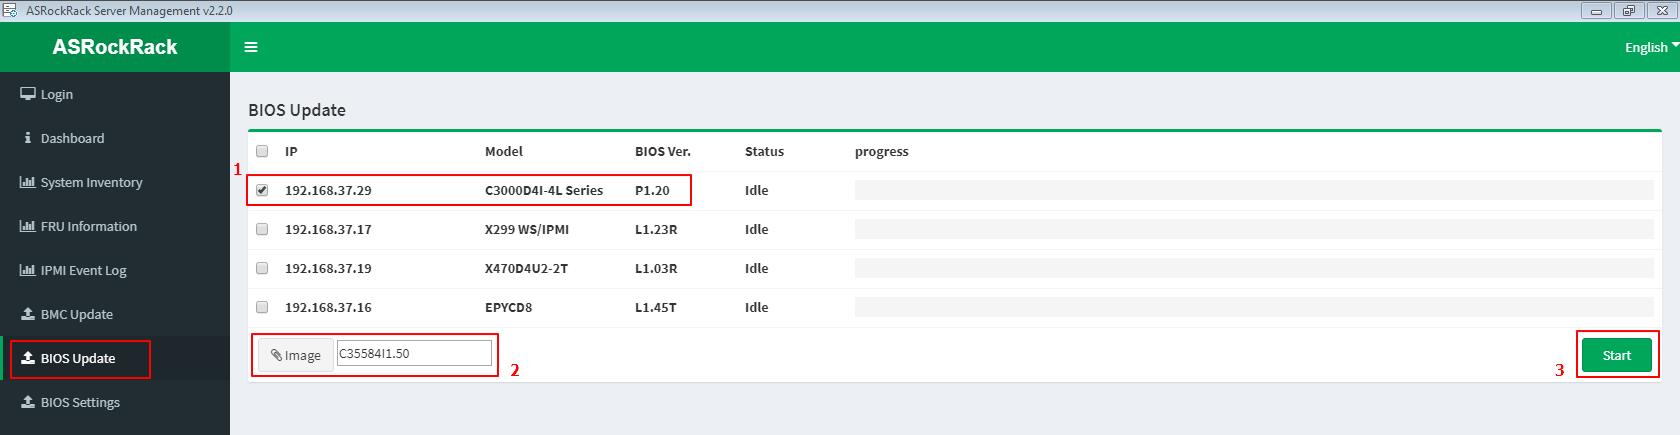
BIOS update is processing with procedures [Upload --> Upgrading --> Idle]
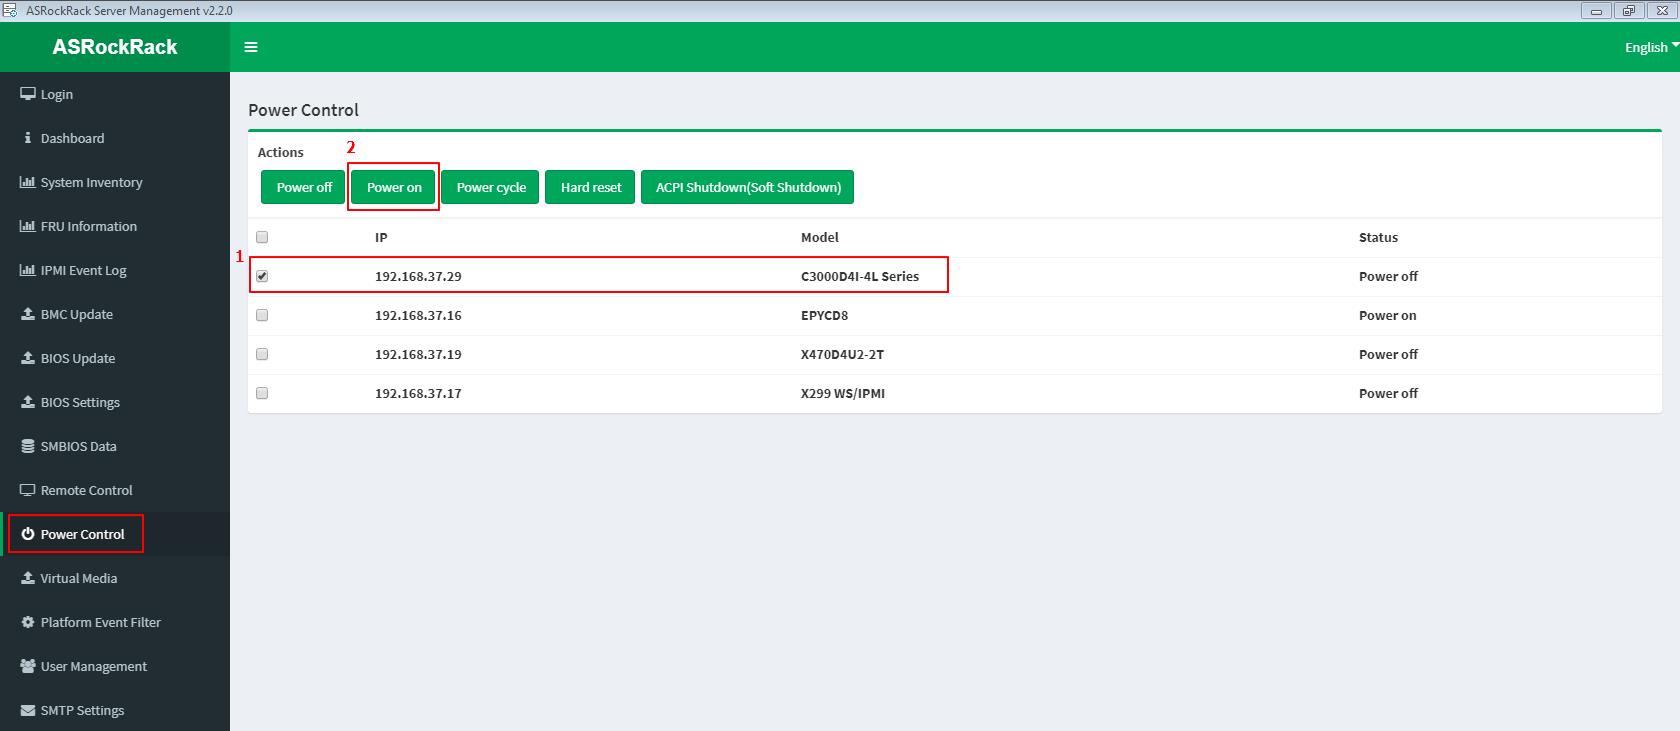
Footstep 3: Power ON/Reboot arrangement remotely
- Tick to select the host machine IP (ex. 192.168.37.xix)
- Click "Power on" ("Hard reset" if for reboot)
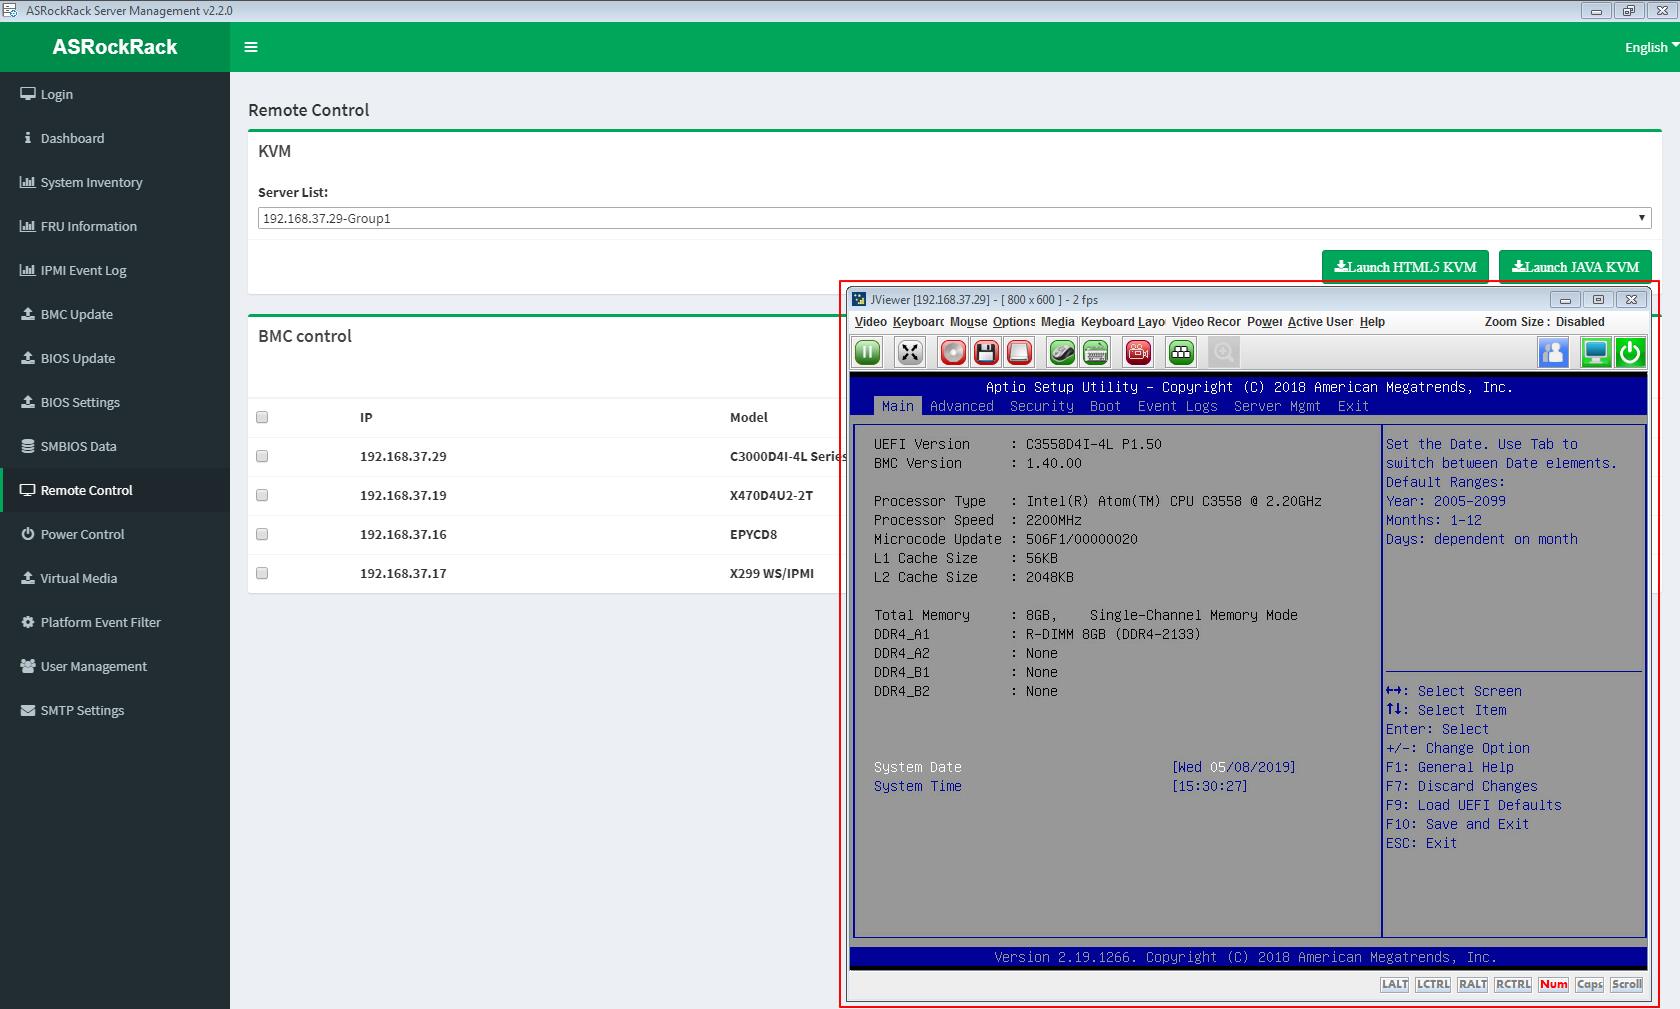
Step 4: Remote control organisation
- Select the host machine (ex. 192.168.37.19)
- Click "Launch JAVA KVM"
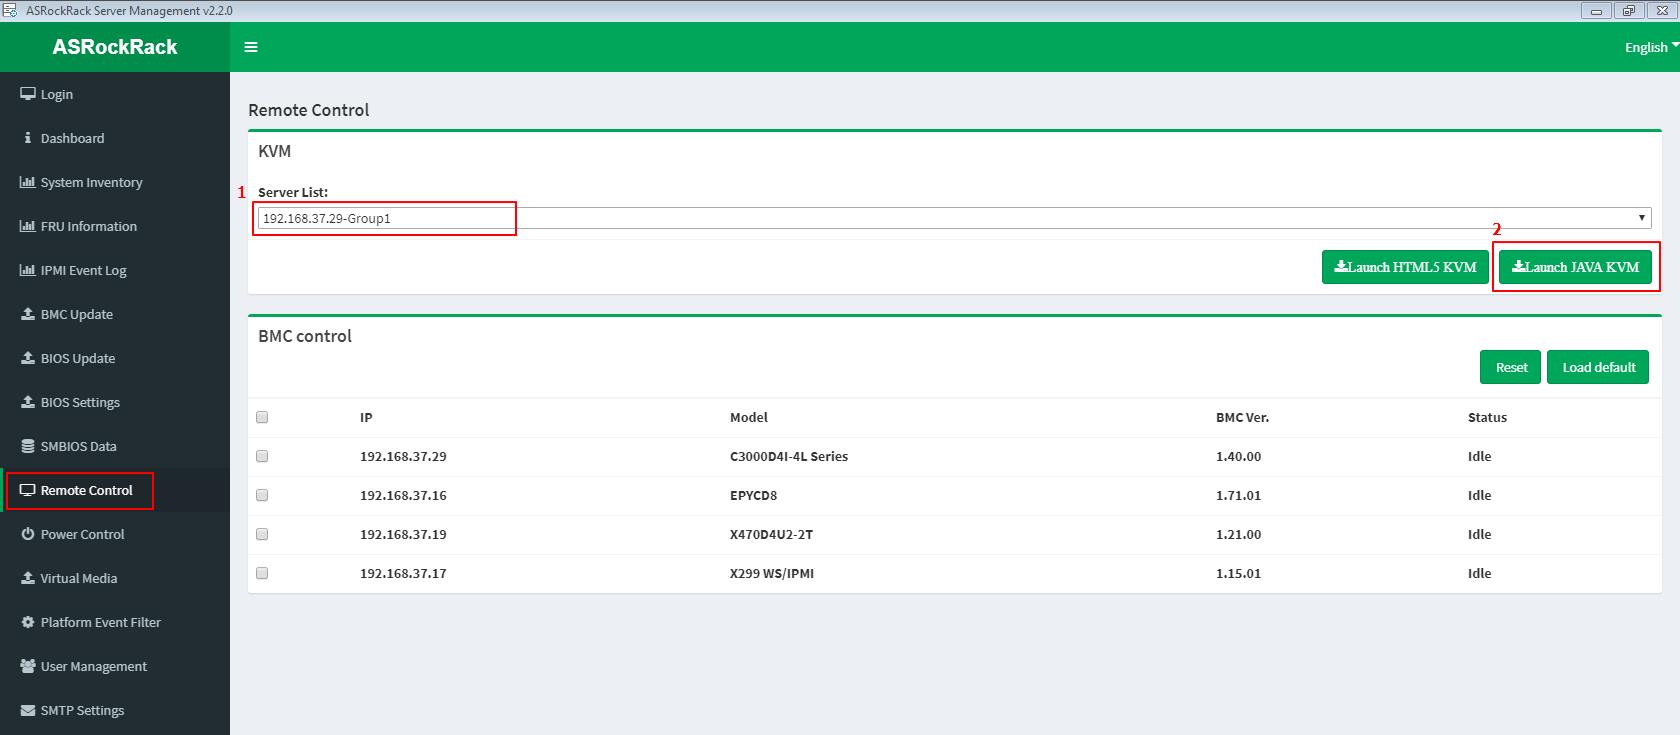
- Remote the host machine by Jviewer. And check to whether the BIOS update process is success or fail.
Step 5: Back to Step 1: Login
Bank check to the latest BIOS version of the host machine.
(For example: Host automobile IP = 192.168.37.29)
BIOS Update Process(IPMI AST2500)
Steps to update BIOS firmware via IPMI webUI
(Supports server motherboard built with BMC AST2500 controller)
BIOS Firmware Update
[Maintenance] -> [BIOS Update]
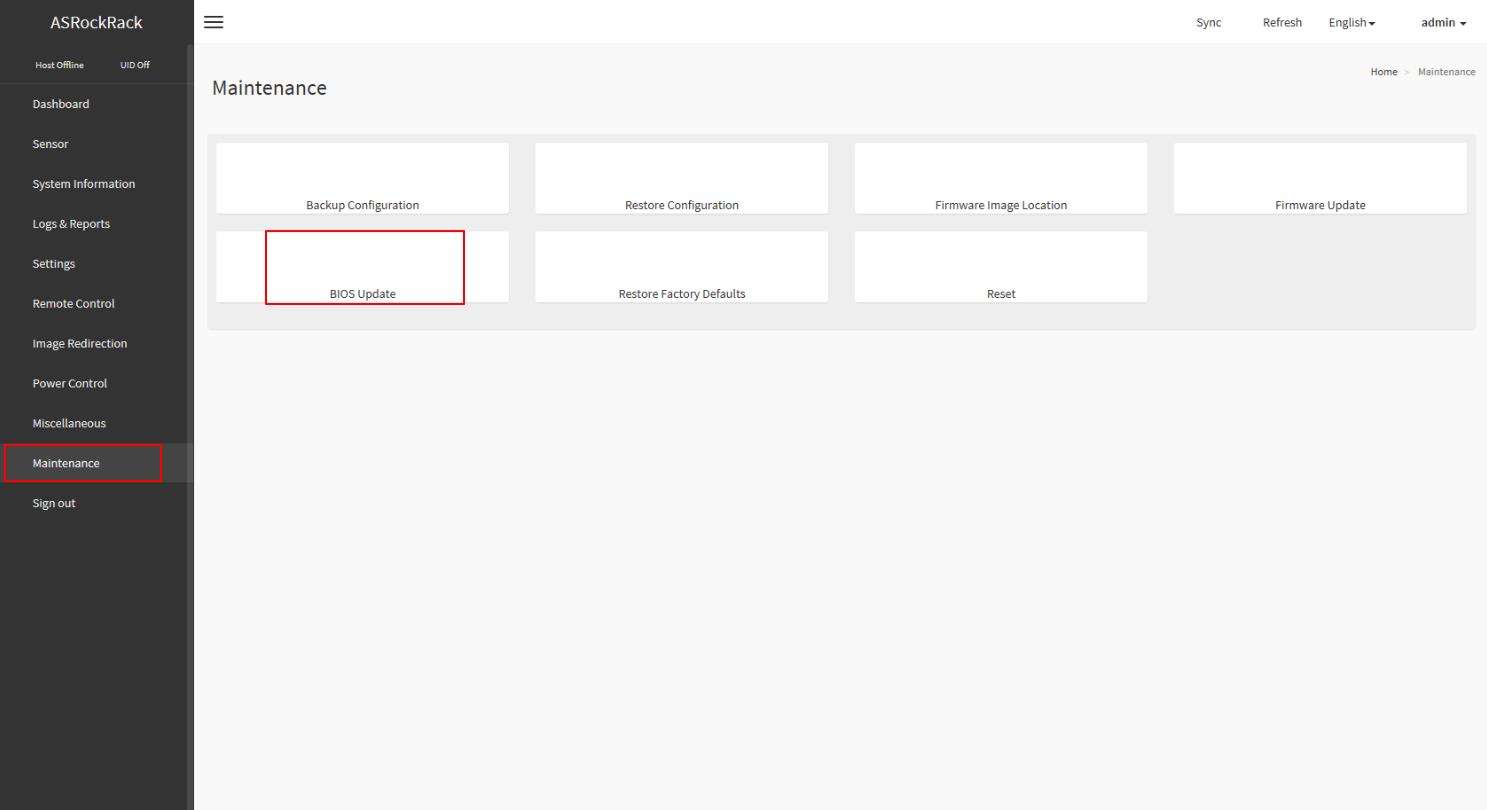
This wizard will takes y'all through the process of firmware upgrades.
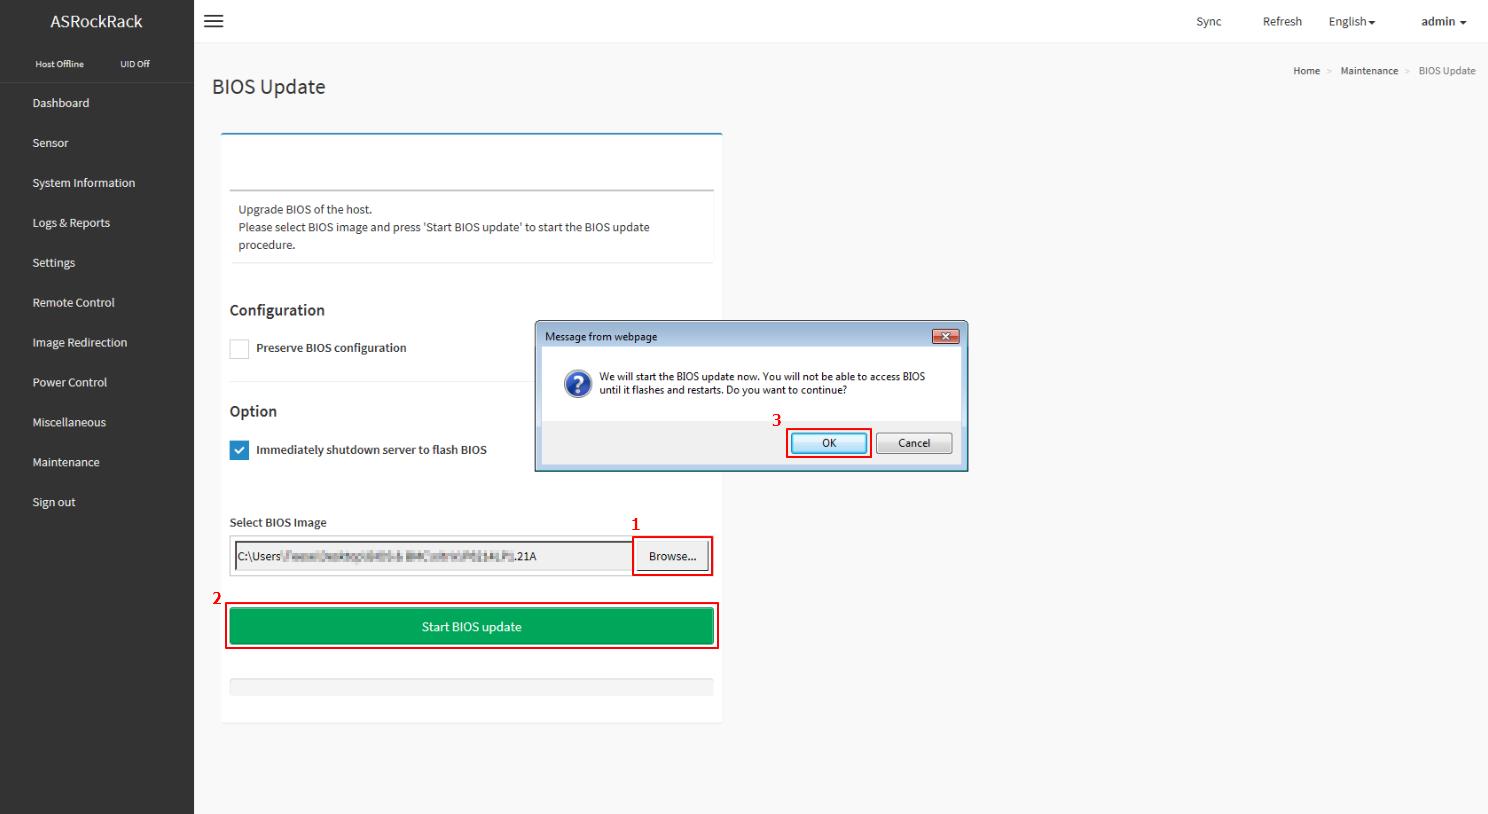
Click the "Browse..." to select the BIOS FW file. Then click "Commencement BIOS update" for the upgrade procedure. And click "OK" if confirmed to continue the process.
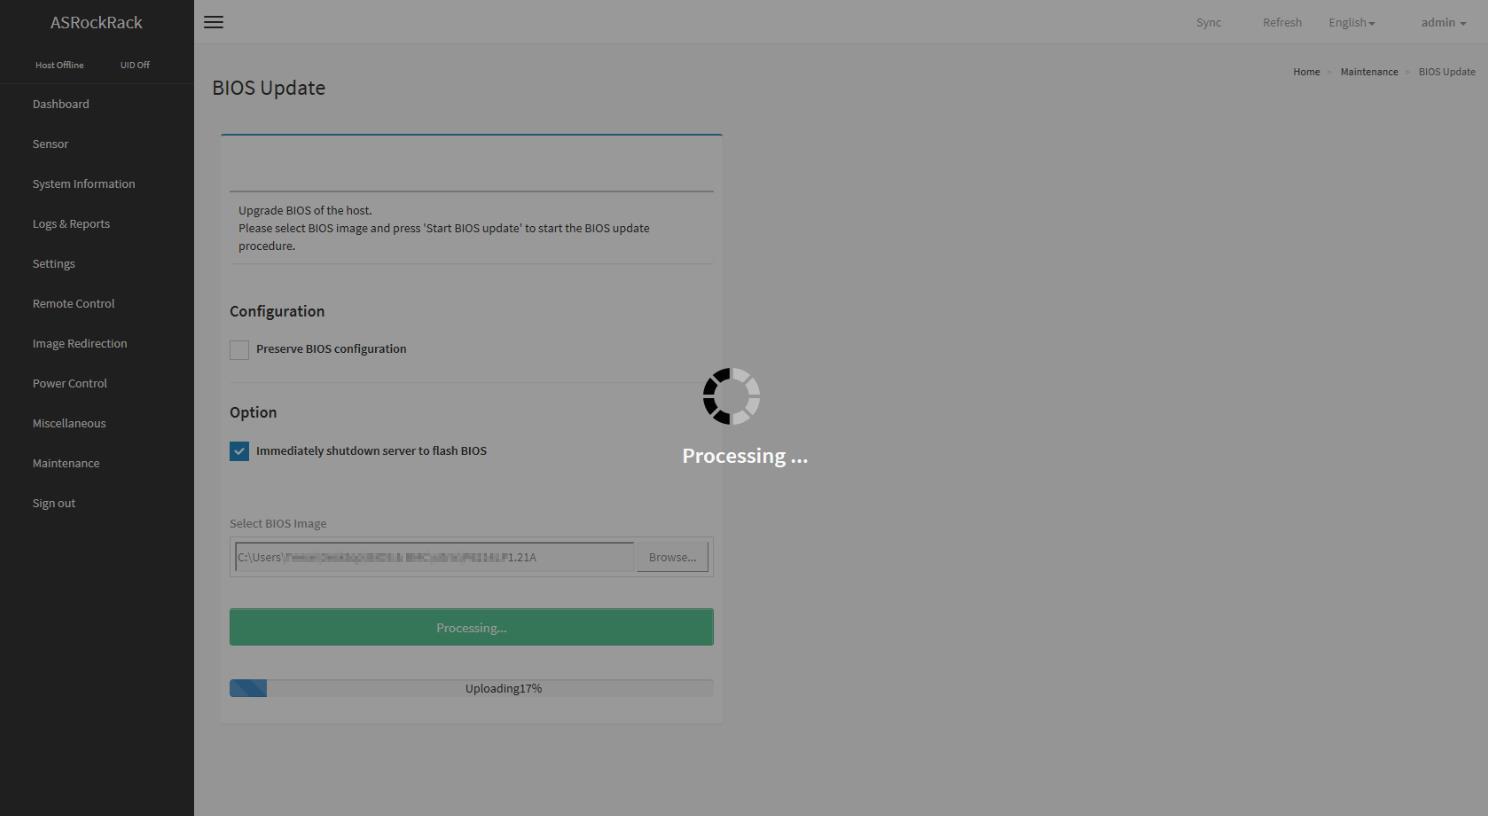
FW verification processing, delight expect a few 2d..
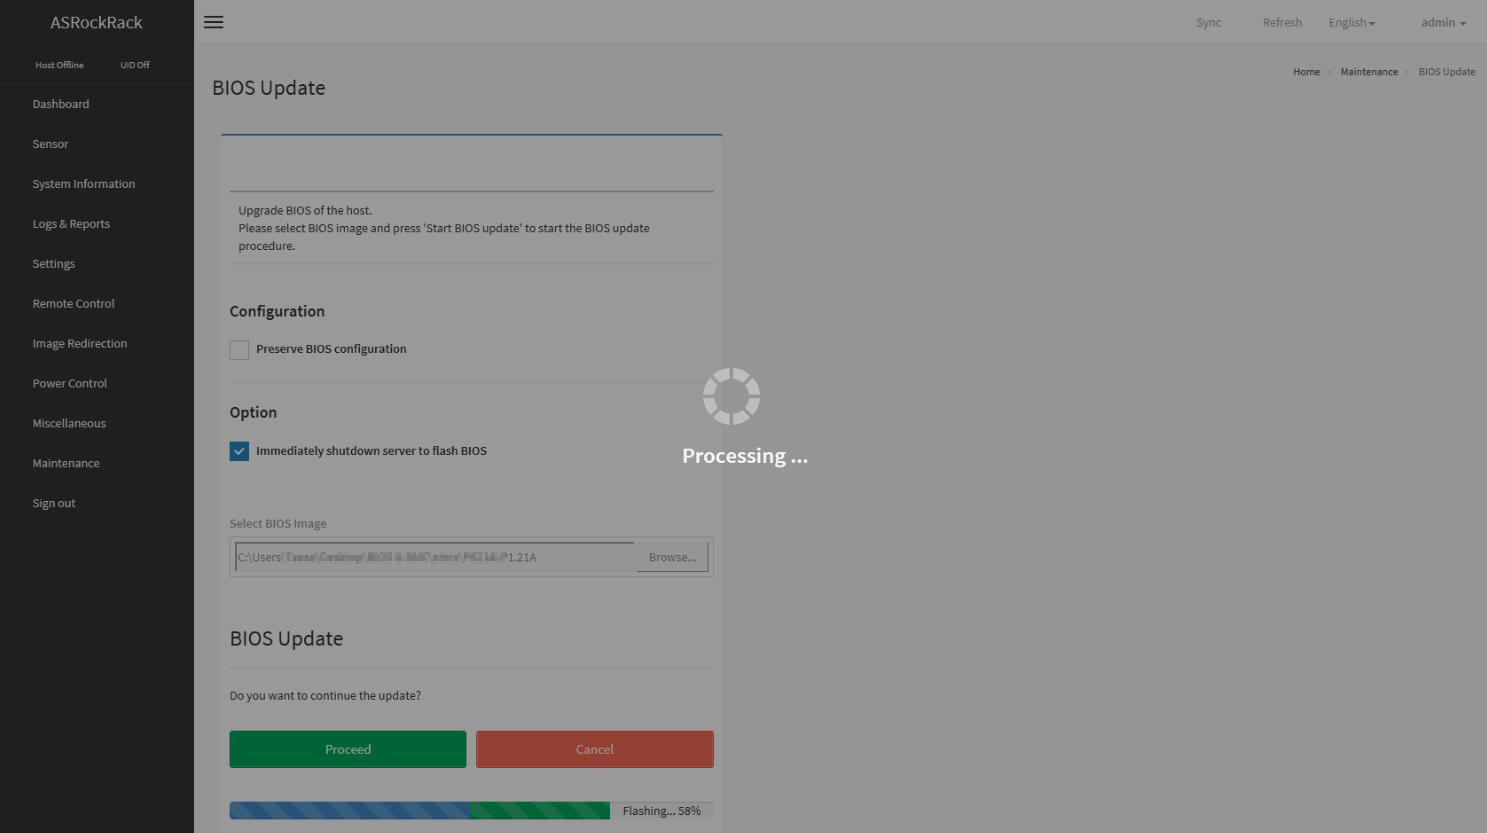
Click "Proceed" to keep the BIOS FW upgrade procedure. Then click "OK" to showtime the actual BIOS FW upgrade operation.

FW updrage is processing, please expect a few 2d..
BIOS FW upgrade process finished. Click "OK" to reload the webpage.
How to update the BIOS FW by EFI Shell?

Source: https://www.asrockrack.com/support/faq.asp?kind=BIOS
Posted by: barnesoneven.blogspot.com
0 Response to "How To Update Asrock Taichi Bios"
Post a Comment